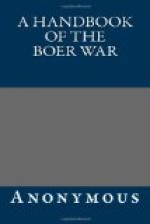
[Illustration: Sketch map of Magaliesberg district.]
On the Boer side there was a transitory interval of weakness. Even before Lord Roberts’ occupation of Pretoria Kruger wrote doubtfully to Steyn; and after it Botha was inclined to negotiate with the invader. He was with his commandos at Hatherley, a few miles east of Pretoria. A Council of War was held in the office of a Russian Jew, who was a distiller of whisky. The leaders complained that they had been deserted by Kruger, who had slunk away with the civil government and all the money he could lay his hands on, and the general opinion was in favour of abandoning the struggle. A meeting between Lord Roberts and Botha was even arranged, when suddenly De Wet intervened. The news of his successful raids on the line of communication in the Free State relaxed the tension of the minds of the despondent commandants. Easily disheartened and easily reassured, they leapt in an instant from one psychological pole to the other. Botha announced that he was ready to meet Lord Roberts, not only in conference, but in battle. The negotiations were, however, not definitely broken off until after the Battle of Diamond Hill.
Lord Roberts had sent Kitchener with a column to see to the trouble in the Free State, and could not put more than about 16,000 men into the field against Botha, who, with 6,000 men, had taken up a strong position astride the Delagoa Bay railway sixteen miles east of Pretoria. His centre was at Pienaar’s Poort, where the railway passes through a defile, and his front, which his former experience of Lord Roberts’ tactics led him to extend greatly, was nearly twenty-five miles in length, and ran along an irregular chain of hills, kopjes, and ridges. Facing the Diamond Hill and Donkerhoek range, south of the centre, is another range of heights through which the two poorts Tyger and Zwavel pass, and which circles round the source of Pienaar’s River towards the Diamond Hill range. North of the centre runs a broken range ending abruptly at the Kameelfontein ridge, which overlooks the broad Kameelfontein valley leading to the Krokodil Spruit; and across the valley rises the Boekenhoutskloof ridge, a detached feature with triangular contours, which, being somewhat in advance, commands the approaches to Kameelfontein ridge, where the Boer right flank under Delarey was posted.
The left flank was on Mors Kop and curved round indefinitely to Kameelzyn Kraal with detached posts in the direction of Tygerpoort. The centre north and south of Pienaar’s Poort was the strongest section of the line, and for this reason and for another it was held by comparatively small numbers. Botha was an acute observer and had learnt the moves of the British autumn manoeuvre opening, a holding attack on the centre not intended to be pushed home in order to eke out paucity of numbers operating on a wide front. Lord Roberts, in spite of his superiority of strength, could not hope to inflict a decisive defeat upon Botha’s well-posted commandos, but only to remove them out of striking distance of Pretoria, and he was successful.


