[Illustration: FIG. 67.—Twofold shortening (making).]
[Illustration: FIG. 68.—Twofold shortening (taut).]
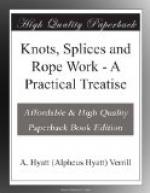
[Illustration: FIG. 69.—Three- and fivefold shortening.]
[Illustration: FIG. 70.—Single plait or monkey chain (making).]
[Illustration: FIG. 70 F.—Monkey chain or single plait (complete).]
[Illustration: FIG. 71.—Twist braid (making).]
[Illustration: FIG. 72.—Twist braid (complete).]
[Illustration: FIG. 73.—Leather cut to braid.]
[Illustration: FIG. 74.—Leather braid (complete).]
Another handsome knot for shortening is the more highly ornamental “Open Chain” (Fig. 75). Make the first loop of the rope secure by a twist of the rope and then pass the loose end through the preceding loop, to right and left alternately, until the knot is complete.
[Illustration: FIG. 75.—Open chain.]
The simplest of all shortenings consists of a loop taken in the rope with the bights seized to the standing part (Fig. 76). This is particularly well adapted to heavy rope or where a shortening must be made quickly. Fig. 77 shows another very simple shortening, which requires no description. This will not withstand a very great strain but is secure from untying by accident and is very useful for taking up spare rope of lashings on bundles or baggage. “Sheepshanks,” or “Dogshanks,” are widely used for shortening rope, especially where both ends are fast, as they can be readily made in the centre of a tied rope. There are several forms of these useful knots. The best and most secure form is shown in Fig. 78. A simple running knot is first made; a bend is pushed through the loop, which is then drawn taut; the other end of the bend is fastened in a similar manner and the shortening is complete. A much simpler form is shown in Fig. 79, but this can hardly be depended upon unless the ends are seized, as shown in Fig. 80. Figs. 81-82 illustrate two other forms of shortenings, but these can only be used where the end of the rope is free, and are intended for more permanent fastenings than the ordinary sheepshank; while Fig. 83 is particularly adapted to be cast loose at a moment’s notice by jerking out the toggles, A, B.


